Have you ever caught yourself daydreaming about walking through the campus of a big international university, coffee in hand, backpack slung across your shoulder? For many students, that dream starts with one intimidating word: visa.
Getting a student visa is often the trickiest part of studying abroad. It’s not as exciting as opening your admission letter, but without it, that letter is just a piece of paper. The good news? Once you break the process down into steps, it’s far less scary than it looks on the surface.
In this article, I’ll walk you through the student visa application process for the UK, Canada, and the USA. I’ll explain the requirements, share a few tips, and also point out common mistakes students make so you don’t have to repeat them. Think of this as a step-by-step roadmap written by someone who’s been through the same stress.
Why These Three Countries?
Before jumping into forms and fees, let’s pause for a second. Why are so many students rushing toward the UK, Canada, and USA in the first place?
- The UK gives you a fast track. Bachelor’s degrees are usually three years, master’s just one year. That means less tuition, less time away from home, and still a top-quality education.
- Canada feels like home for many internationals. It’s welcoming, multicultural, and compared to the US or UK, the costs are often more manageable. Plus, Canada’s post-study work options are attractive.
- The USA—well, you already know. From Harvard and MIT to thousands of strong state universities, the US still feels like the “big stage.” Careers in tech, medicine, finance, and more often begin here.
So depending on your dream, the visa you chase will look slightly different.
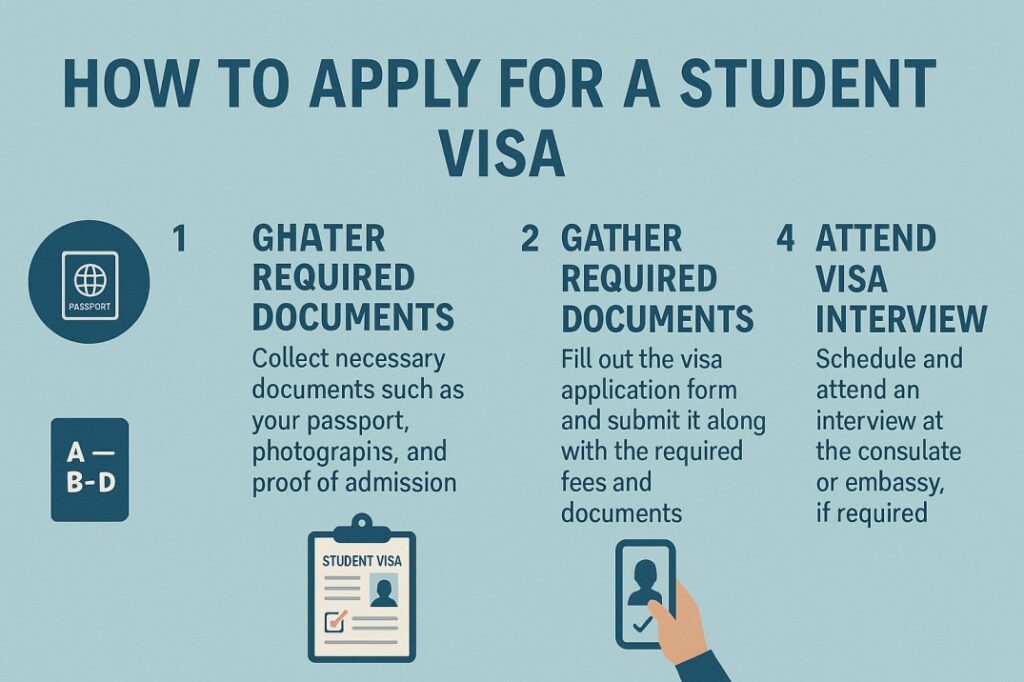
UK Student Visa: Step-by-Step
1. Get Your CAS (Confirmation of Acceptance for Studies)
Without this, you can’t move forward. Your chosen university sends you a CAS once you’ve been accepted. Think of it as your “golden ticket.”
2. Prepare Your Finances
Money talks in visa applications. You’ll need to prove you can cover:
- Tuition fees
- Living costs (around £1,334/month in London or £1,023/month outside London)
Bank statements, loan letters, or scholarship confirmations usually do the trick.
3. Apply Online
Head to the UK Home Office website. Fill the student visa form carefully—tiny mistakes can cost you weeks.
4. Pay Fees
- Application fee: ~£490
- Immigration Health Surcharge: ~£776/year
It stings a little, but it covers healthcare while you’re there.
5. Biometrics & Possible Interview
At the visa application center, you’ll give fingerprints and a photo. Some students are asked a few questions—stay calm, they’re not trying to trap you.
6. Wait for the Decision
Usually 3–8 weeks. Honestly, this part is the hardest.
Canadian Study Permit: Step-by-Step
1. Get a Letter of Acceptance (LOA)
Only from a Designated Learning Institution (DLI). Double-check that your school is on the list.
2. Show Proof of Funds
For one year, you need to cover:
- Tuition
- Living expenses (~CAD 20,635 if outside Quebec)
- Return travel
3. Apply Through IRCC Portal
The online application is straightforward but detailed. Answer honestly—Canada values transparency.
4. Biometrics + Medical Exam
Mandatory. Some countries’ students must take medical tests too.
5. Processing Time
Anywhere from 1–3 months. If you’re from a country under the Student Direct Stream (SDS), it’s quicker.
6. Get Your Study Permit
You’ll get a Port of Entry Letter and, if needed, a visitor visa or eTA. Don’t confuse the letter with the permit—the actual permit is handed to you when you land in Canada.
USA F-1 Student Visa: Step-by-Step
1. Admission to a SEVP School
You’ll receive an I-20 form from your university. This is the base of your application.
2. Pay SEVIS Fee
Around \$350. Do this before anything else—it registers you in the Student and Exchange Visitor System.
3. Fill DS-160 Form
The famous online application. Attach your photo. Print the confirmation page—you’ll need it.
4. Book Your Interview
This is where the nerves kick in. Waiting times for interviews vary wildly, so book early.
5. The Interview
This is the heart of it. Be ready for questions like:
- Why did you choose the US?
- Who is funding you?
- What are your plans after graduation?
Answer honestly. Visa officers can tell when you’re memorizing lines.
6. Approval and Stamping
If approved, you’ll get your F-1 visa. Simple as that.
Challenges Students Face
- Financial Proof Problems: Submitting weak or inconsistent bank statements is a red flag.
- Last-Minute Panic: Waiting until the final month to apply is risky. Start at least 3–6 months early.
- Interview Anxiety: Officers aren’t there to fail you—they just want to confirm your intentions.
- Document Confusion: CAS, I-20, LOA—don’t mix them up. Each country uses its own system.
Tips That Actually Help
- Stay Honest: If you don’t know an answer, admit it. Don’t bluff.
- Organize Your Papers: Carry originals + copies. Nothing looks worse than shuffling cluelessly at the counter.
- Show Home Ties: Especially for US visas—family, job offers, or property in your home country help.
- Health Insurance: All three countries expect you to have it. Don’t leave it till the last minute.

FAQs
Q1. How early should I apply? At least 3–6 months before classes begin. Earlier if you’re eyeing the US because interview slots fill fast.
Q2. Can I work while studying?
- UK: 20 hours/week during term
- Canada: 20 hours/week (off-campus)
- USA: Mostly on-campus, max 20 hours/week
Q3. What if I’m rejected? Don’t panic. Read the reason, fix it, and reapply. Many students succeed the second time.
Q4. Is IELTS mandatory? In most cases, yes. Some universities waive it if you studied previously in English.
Q5. Can I take my spouse or kids?
- UK: Dependents allowed for postgraduate students
- Canada: Yes, they can apply for work/study permits
- USA: Yes (F-2 visas), but they can’t work
Q6. How long can I stay after graduation?
- UK: 2 years (Graduate Route)
- Canada: 1–3 years (PGWP)
- USA: 1 year OPT, extendable to 3 years for STEM grads
Final Thoughts
The visa process isn’t glamorous, but it’s the bridge to your dream. Break it into steps, be patient, and don’t cut corners. Thousands of students succeed every year—you can too.
If you start early, stay truthful, and keep everything organized, there’s no reason your application won’t be approved. So, go ahead—take the first step today. That dream of walking across your new campus? It’s closer than you think.